How to Use Your Square Miter Gauge for Precision Cuts

What is Square Miter Gauge?
If you want to make precise cuts on your woodworking projects, you need to use a square miter gauge. The miter gauge is one of the most important tools on your table saw. It's used for crosscutting, which is when you cut a board perpendicular to its grain. A good miter gauge should be easy to adjust and have a smooth, friction-free movement.
This tool ensures that your cuts are perpendicular to the grain of the wood, which is essential for achieving a professional look. Here's how to use a square miter gauge for precision cuts.
Most woodworking projects will require at least some basic cuts with a miter gauge, and a table saw is the best tool for the job. If you've ever struggled with making perfect square miters, never fear! With this handy guide, you'll be able to make them every time. square miters can be tricky, but by following a few simple steps and practicing a bit, you'll be a pro in no time.
A square miter gauge is a tool used to make precise cuts in woodworking projects.
Using a square miter gauge is one of the quickest and most accurate ways to make cuts in woodworking projects. It allows you to make precision cuts, ensuring that your project turns out to look its best.
It’s a tool that every serious woodworker should have in their arsenal. Here are some tips on how to use a square miter gauge:
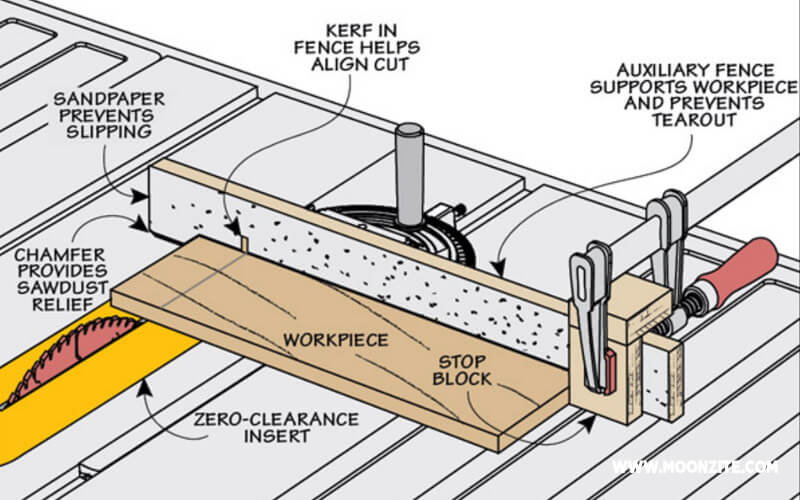
First, set the fence of the gauge at the desired width of the cut. Then, position the blade so that it is flush with the table saw fence. Finally, align the teeth of the blade with those of the sawtooth guide on the backside of the base plate.
The tool ensures that cuts are perpendicular to the grain of the wood.
There are many different types of miter gauges on the market, but they all work in basically the same way. The tool consists of a base that attaches to your table saw or router table and a bar that slides back and forth along the base.
It ensures that cuts are perpendicular to the grain of the wood. This is especially important when joining two pieces of wood together at a 90 degree angle. Without a miter gauge, it would be very difficult to get an accurate cut.
Simply align the gauge with your saw blade, and make sure that the guide is flush against the fence before making your cut.
There are a number of important things to keep in mind when squaring your miter gauge.
- The tool must be properly positioned so that cuts are perpendicular to the grain of the wood.
- It is important to make sure that the blade is positioned at 90 degrees to the table saw fence.
- When making cuts with a miter gauge, always use a push stick or other means of keeping your fingers away from the blade.
To use the tool, first, align the blade with the mark on the board.
Square Miter Gauge is essential for any woodworker, whether you're a beginner or a seasoned pro. Here's how to use it:
To start, align the blade of your saw with the mark on the board. Then, simply make your cut as usual. The square miter gauge will automatically adjust itself so that it's always at a 90-degree angle to the blade - ensuring accuracy and preventing those pesky mismatched pieces!
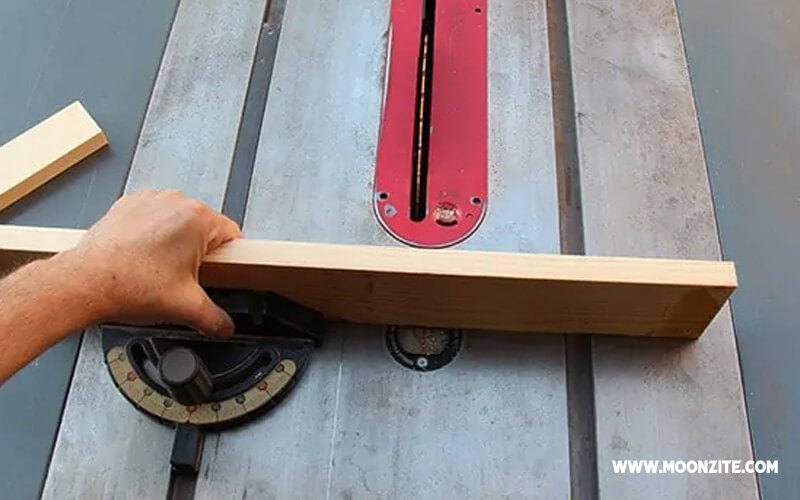
Then, holding the board firmly in place, slide the gauge along until it touches both the fence and the blade.
Then, holding the board firmly in place, slide the gauge along until it touches both the fence and the blade.
It's easy to make perfectly square corners when you have a miter gauge on your table saw.
Setting your saw blade to 90 degrees. Then, holding the board firmly in place, slide the gauge along until it touches both the fence and blade. Next, measure the distance from the blade to the fence and make sure that it is exactly equal on both sides.
Finally, tighten down all screws before making your cut.
Now it's time to tighten down those screws!
This can seem like a daunting task at first glance, but we promise - it's not as complicated as it looks! Make sure that all of the screws are tightened down before making your cut. This will help keep the gauge from moving around during use. Next, align the blade of your saw with the markings on the gauge. Then, simply make your cut and enjoy perfectly squared miters every time!
Leave a Comment